This tip was inspired by those of you who’ve reached out asking “What’s the proper way to enter a bill and pay it in QuickBooks?”.
I created a video to share how I recommend entering bills and how to decide if this is a feature you should even be using in QuickBooks since it’s a two-step process. Remember… don’t waste time on features you don’t need to be using. I also included how to properly pay bills with your credit card in QuickBooks.
Are you tired of shuffling through paper bills, missing payment deadlines, or spending precious hours handling vendor payments? QuickBooks Desktop Bill Pay might just be the solution your business needs As someone who’s helped small businesses streamline their financial processes, I’ve seen firsthand how the right bill payment system can transform operations.
Why Managing Bill Payments Matters for Your Business
Let’s face it – nobody enjoys paying bills. But for businesses, efficient bill management is crucial. Late payments damage vendor relationships and incur unnecessary fees, while disorganized payment tracking creates accounting nightmares.
QuickBooks Desktop offers robust bill payment features that can:
- Save you valuable time
- Help avoid late payment fees
- Keep your books accurate automatically
- Improve cash flow management
- Strengthen vendor relationships
Getting Started with Bill Pay in QuickBooks Desktop
Before you can start paying bills like a pro, you need to know how to access the bill payment features in QuickBooks Desktop
- Open your QuickBooks Desktop file
- Click on “Vendors” in the top menu bar
- Select “Pay Bills” from the dropdown menu
This will open the Pay Bills window where you can view all outstanding bills owed to vendors It’s your command center for bill management!
The Complete Step-by-Step Process to Pay Bills in QuickBooks Desktop
Step 1: Review Your Bills
Before making payments, it’s crucial to review bills for accuracy:
- In the Pay Bills window, select the bill you want to review
- Click “Go to Bill” to open and examine the bill details
- Verify that all information is correct, including amount and due date
- Click “Close” when done reviewing to return to the Pay Bills window
Taking this extra review step helps catch any discrepancies with vendors early and prevents payment errors.
Step 2: Select the Bills You Want to Pay
Now it’s time to actually pay those bills:
- In the Pay Bills window, check the box next to each bill you want to pay
- The bottom of the window will show the total amount selected for payment
- You can filter bills by due date or vendor if you have many bills to sort through
Step 3: Choose Your Payment Method
QuickBooks Desktop gives you several options for bill payment:
-
Check payments:
- Select “To be printed” if you want QuickBooks to create checks for printing
- Select “Assign check number” if you’re writing checks manually
-
Online payments:
- Click “Pay Online” if you have QuickBooks Payments set up
- Enter payment details including amount and date
- Click “Pay Selected Bills”
-
Credit card payments:
- Choose the credit card account as payment method
- Enter amounts to pay for each bill
- Click “Pay Selected Bills”
-
Cash or other payment methods:
- Select “Cash” as the method
- Click “Pay Selected Bills”
Step 4: Complete the Payment
After selecting your payment method:
- Enter the payment date
- If using checks, enter the starting check number if needed
- Verify the payment account (which bank account or credit card)
- Click “Pay Selected Bills”
QuickBooks will then record the payments and update your accounts payable records automatically.
Advanced Bill Payment Features in QuickBooks Desktop
Applying Vendor Credits
If you have credits from a vendor, you can apply them to reduce bill amounts:
- When paying a bill, click the “Credits” tab
- Check the box next to any credits you want to apply
- The credit amount will be deducted from your payment total
- Click “Pay Selected Bills” to complete the transaction
Paying Multiple Bills at Once
Save time by batching your bill payments:
- Select the checkbox next to all bills you want to pay
- Choose your payment method
- Enter payment details
- Click “Pay Selected Bills”
This bulk payment approach is a huge time-saver for businesses with many vendors.
Setting Up Recurring Bill Payments
For regular bills that don’t change, automate the payment process:
- Go to Lists menu > Memorized Transactions > Memorized Transaction List
- Click “Memorize Pay Bills” and set up payment details
- Click “OK”
QuickBooks will automatically enter the payment on the scheduled date. No more forgetting monthly services!
Bookkeeping Benefits of Using QuickBooks Desktop Bill Pay
One of the biggest advantages of paying bills through QuickBooks is automatic reconciliation. When a payment is made, QuickBooks Desktop Payments automatically:
- Records the transaction in your books
- Updates accounts payable
- Matches payments to bills
- Keeps your financial records organized
As QuickBooks states, “Your books stay organized all year, with no extra effort.” This automation reduces errors and saves accounting time.
QuickBooks Payments: Taking Bill Pay to the Next Level
While the standard bill payment features in QuickBooks Desktop are powerful, QuickBooks Payments integration offers additional benefits:
Faster Payments and Deposits
With QuickBooks Payments, you can:
- Process ACH bank transfers at 1% per transaction
- Get paid 1.4x faster on average with online invoicing
- Receive next-day deposits from credit cards and ACH payments
- Get instant deposits (for 1.75% more) even on weekends and holidays
Multiple Payment Options
QuickBooks Payments lets you accept:
- Credit and debit cards
- ACH bank transfers
- eChecks
- Apple Pay and Google Pay
Pricing Options for QuickBooks Payments
QuickBooks offers two pricing structures:
Pay as you go ($0/month)
- ACH bank transfers: 1%
- Card – Swiped: 2.4% + 30¢
- Card – Invoiced: 3.5% + 30¢
- Card – Keyed: 3.5% + 30¢
Monthly plan ($20/month)
- ACH bank transfers: 1%
- Card – Swiped: 1.6% + 30¢
- Card – Invoiced: 3.3% + 30¢
- Card – Keyed: 3.3% + 30¢
Enterprise customers save an average of 18% on payment fees compared to standard rates!
Common Bill Pay Questions Answered
Are online payments treated differently in QuickBooks Desktop?
From an accounting perspective, all payments are recorded similarly regardless of payment method. However, digital payments give you more insight into payment status, helping you make better cash flow decisions.
Is QuickBooks Desktop Bill Pay secure?
Yes! QuickBooks ensures all payment transactions are PCI-DSS compliant, meeting strict data security requirements to protect your financial information and prevent fraud.
Does QuickBooks Bill Pay work with all Desktop versions?
QuickBooks provides merchant services for all QuickBooks Desktop products, including Pro, Pro Plus, Premier, Premier Plus, and Enterprise. No matter which version you use, your payment transactions and accounting entries stay perfectly synced.
Are there contracts required for QuickBooks Payments?
No contracts are required! You can cancel QuickBooks Payments anytime with no termination fees, setup fees, or monthly minimums.
Real-World Benefits: What Users Say About QuickBooks Desktop Bill Pay
I’ve talked with many business owners who use QuickBooks Desktop Bill Pay, and their feedback consistently highlights these benefits:
“QuickBooks Desktop Payments is more convenient for my business, and funds are available a lot faster than receiving a paper check.” – Nick P., QuickBooks Desktop Enterprise Silver user
“With QuickBooks Desktop Payments, I’m getting paid so much faster now that I’m not having to wait for checks in the mail.” – Peter S., QuickBooks Desktop Premier user
My Personal Experience with QuickBooks Bill Pay
When I implemented QuickBooks Desktop Bill Pay for my own business, I immediately noticed two major improvements:
- Time savings: What used to take hours each week now takes minutes
- Cash flow visibility: I can now see exactly when payments are due and plan accordingly
The ability to pay multiple bills at once and schedule recurring payments has been a game-changer for me. No more weekend panic sessions trying to get payments out before Monday!
Tips for Bill Pay Success
After years of using this system, here are my top tips for getting the most from QuickBooks Desktop Bill Pay:
- Set a regular bill pay schedule – Whether it’s weekly or bi-weekly, consistency helps
- Use the filter options to manage large volumes of bills
- Take advantage of vendor credits whenever possible
- Memorize recurring transactions for regular bills
- Reconcile accounts regularly to ensure everything matches up
Final Thoughts: Is QuickBooks Desktop Bill Pay Right for Your Business?
If you’re still processing bills manually or using a system that doesn’t integrate with your accounting, you’re likely wasting time and risking errors. QuickBooks Desktop Bill Pay streamlines the entire process from receipt to payment to reconciliation.
For businesses already using QuickBooks Desktop, implementing the bill pay features is a no-brainer. The time savings alone justify the minimal setup effort, and the improved cash flow management is invaluable.
Remember, effective bill management isn’t just about paying on time—it’s about optimizing your entire accounts payable process to support your business goals. QuickBooks Desktop Bill Pay helps you do exactly that.
Ready to get started? Sign in to your QuickBooks Desktop account today and start exploring the bill payment features. Your future self (and your accountant!) will thank you.
Have you tried QuickBooks Desktop Bill Pay? What’s been your experience? Share in the comments below!
Steps To Enter a Bill in QuickBooks Desktop:
- Open the ‘Enter Bills’ window: Choose Vendors > Enter Bills.
- Select the Vendor: From the drop-down menu, choose the vendor that you received the bill from.
- Enter the Date: Input the date that is listed on the bill you received.
- Enter the Bill’s Reference Number: This can be found on your bill and can include an invoice number or other identifying details.
- Input the Amount Due: This will be the total amount that is due on your bill.
- Choose an Account for the Bill: If it’s a bill for something like utilities or rent, you might choose an expense account. If it’s a bill for items that you’ll sell in the future, you might choose an inventory asset account.
- Input a Memo (optional): You can write a short note about the bill if needed.
- Assign Billable Customers or Class (optional): If you need to charge this bill back to a customer, or if you want to keep track of expenses for specific jobs or locations, use these fields.
- Save and Close: Click on this button to save and close the bill, or click “Save and New” to save and enter another bill.
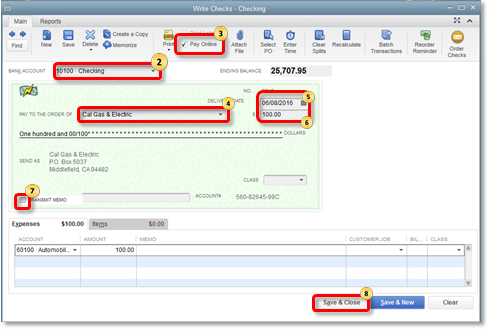
Steps To Pay a Bill in QuickBooks Desktop:
- Open ‘Pay Bills’ Window: Choose Vendors > Pay Bills.Select the Bill to Pay: From the list, select the bill or bills that you want to pay. You can use the filter options to find the specific bills you are looking for.
- Choose Payment Account: From the dropdown menu, select the bank or credit card account from which you will make the payment.
- Enter the Payment Date: Input the date you’re making the payment.
- Choose Payment Method: Select the method of payment (check, credit card, online bank payment, etc.)
- Enter Payment Details: If you’re paying by check, input the check number. If you’re paying by credit card, enter your credit card details.
- Review Amount to Pay: Check the amount that QuickBooks auto-populates in the ‘Amount to Pay’ field. Adjust if necessary.
- Assign Discounts or Credits (optional): If you have any discounts or credits with your vendors, you can apply them here.
- Click ‘Pay Selected Bills’: Once everything looks good, click on this button to pay the selected bill or bills.
- Save and Close: Click on ‘Done’ to close the window after completing your payments.
