Are you tired of juggling multiple bills and payment methods? Quicken for Mac Bill Pay might just be the solution you’ve been searching for. As someone who’s spent countless hours managing personal finances I can tell you that streamlining your bill payment process is a game-changer. Let’s dive into everything you need to know about using Quicken’s Bill Manager on your Mac.
What is Quicken Bill Manager?
Quicken Bill Manager is a powerful feature that lets you view and pay all your bills in one convenient place. Gone are the days of logging into multiple websites or writing checks by hand. With Bill Manager, you can:
- Track all your bills in one location
- Receive reminders before bills are due
- Pay bills electronically or through check services
- Keep detailed records of all payments
The Bill Manager offers two primary ways to handle your payments:
- Quick Pay: Send electronic payments to over 11,000 supported billers who have online accounts accessible by Quicken
- Check Pay: Send physical checks to anyone in the United States with an address (without having to print or mail them yourself)
Setting Up Quicken Bill Manager on Mac
Getting started with Bill Manager requires a few simple steps. Let’s break down the process:
Step 1: Add Online Bills
First, you’ll need to add your bills to the system:
- Navigate to the Bills & Income tab
- Click Get Started (or the + sign in the upper-right corner and select Online Bill)
- Search for the biller you want to add
- Enter your login credentials for that biller’s website
- Quicken will authenticate your account and search for your bills
- You’ll receive a confirmation screen where you can link to an existing Reminder or create a new one
Note: It may take some time for new bill amounts and PDFs to appear in Bill Manager after adding a biller.
Step 2: Enable a Payment Account for Quick Pay
To use Quick Pay, you need to enable a payment account:
- Go to the Bills & Income tab and click the gear icon in the upper right
- Select Pay Bills with Bill Manager
- Review and agree to the Terms of Use
- Complete any verification process (including mobile verification if prompted)
- In the Payment Accounts for Quicken Bill Manager screen, select the account you want to use (typically checking) and click Enable
- Fill out the required information in the Enable Payment Account screen
- Check the box at the bottom and click Enable Account
You’ll receive a verification screen confirming that your account can now be used for Quick Pay payments If you only want to use Quick Pay, you can click Done and start paying bills right away
Step 3: Set Up Check Pay (Optional)
If you want to send physical checks through Quicken’s service, there’s an additional verification process:
- Within three days of enabling your payment account, Quicken will make two micro-deposits (between $0.01 and $0.99) to your account
- Check your register for deposits with the payee name “Sp Quicken”
- When they appear, go to the Bills & Income tab and click the Account needs verification message
- Select Verify Deposit
- Enter the deposit amounts and click Verify Account
- Click Done to complete the process
Important: The micro-deposits will eventually be withdrawn by Check Pay, but the amounts will still be valid for verification.
Adding Manual Bills for Check Pay
Not all bills can be accessed online, or maybe you prefer tracking certain bills manually. Here’s how to add a manual bill:
- Select the Bills & Income tab
- Click the + sign
- Choose Manual Bill
- Enter the payee name in the Pay to field and click Next
- Select Allow paying with Check Pay
- Provide the following details:
- Payee name
- Account number (optional but helpful)
- Complete mailing address (street, city, state, zip)
- Verify the address and click Done
- Click Done again on the Add Bill Reminder screen
Your new bill will appear in the Biller list with Check Pay as the default action.
Using Bill Manager Day-to-Day
Once everything is set up, paying bills becomes much simpler. Here’s how to manage your regular bill payments:
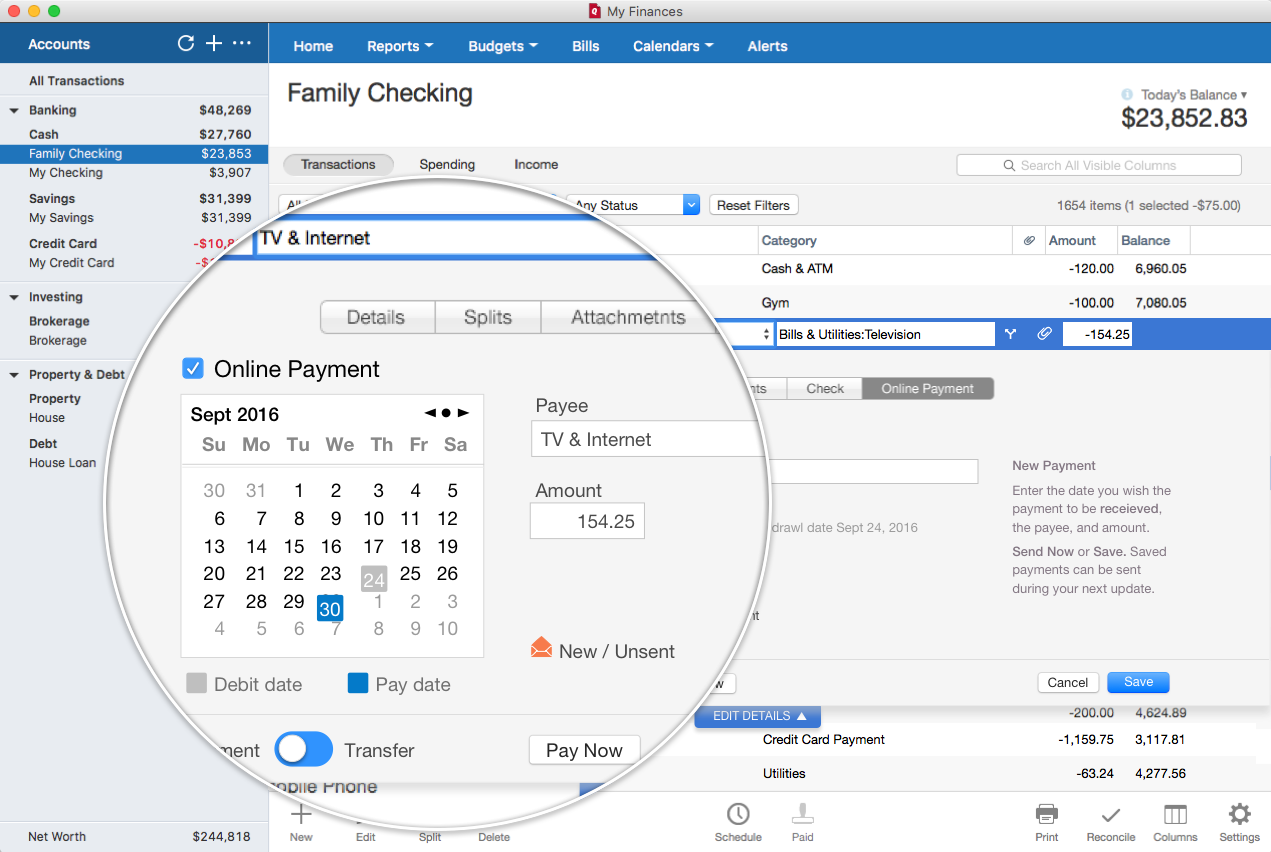
Paying Bills with Quick Pay
- Go to the Bills & Income tab
- Find the bill you want to pay in your list of billers
- Click the bill to open its details
- Select the Quick Pay option
- Enter the payment amount and delivery date
- Confirm the payment details
- Click Schedule Payment
Paying Bills with Check Pay
- Navigate to the Bills & Income tab
- Locate the manual bill you want to pay
- Click the bill to view details
- Select the Check Pay option
- Enter the payment amount and delivery date (remember to allow extra time for mailing)
- Verify the payee address
- Click Schedule Payment
Pro Tips for Quicken Bill Manager on Mac
After using this feature extensively, I’ve discovered some helpful tips:
- Schedule in advance: You can schedule payments up to a year ahead, which is perfect for fixed bills like mortgage payments
- Track payment history: Keep tabs on all your past payments by clicking on a biller and selecting the “Payment History” tab
- Use the calendar view: Switch to calendar view in the Bills & Income tab for a visual representation of when bills are due
- Set up alerts: Configure email or mobile notifications to remind you when bills are coming due
- Verify after backups: If you restore from a backup file, you may need to re-enable your accounts for Quick Pay and Check Pay
Common Issues and Solutions
Like any financial tool, you might encounter a few hiccups along the way:
Problem: Bill Manager doesn’t show my latest bill
Solution: Some billers only make bills available a few days before the due date. Check your biller’s website to see when new bills typically post.
Problem: Quick Pay payment failed
Solution: Verify that your payment account has sufficient funds and that the account information is correct. Also, ensure the biller is still supported for Quick Pay.
Problem: Check Pay verification deposits haven’t arrived
Solution: The micro-deposits can take up to three days to appear. If it’s been longer, contact Quicken support to investigate.
Problem: Can’t find a specific biller in the search
Solution: Try different spellings or abbreviations of the company name. If the biller isn’t available for Quick Pay, you can still add them as a manual bill for Check Pay.
Pricing and Value
Quicken Bill Manager isn’t free—it’s an additional subscription service on top of your Quicken for Mac software. However, when you consider the time saved, the elimination of postage costs, and the convenience of managing everything in one place, many users (including myself) find it well worth the investment.
The service works with various Quicken versions, including:
- Quicken Business
- Quicken Deluxe
- Quicken Premier
- Quicken Starter
Is Quicken for Mac Bill Pay Right for You?
I believe Quicken Bill Manager is ideal for:
- People who pay 5+ bills monthly
- Mac users who prefer consolidated financial management
- Anyone who wants to reduce paper clutter
- Busy professionals who need to automate financial tasks
- Small business owners tracking both business and personal expenses
However, it might not be necessary if:
- You only have a couple of monthly bills
- You prefer using your bank’s bill pay service
- You’re comfortable managing payments through individual biller websites
Final Thoughts
Quicken for Mac Bill Pay through Bill Manager has genuinely transformed how I handle my monthly finances. The ability to see all my bills in one place, schedule payments in advance, and kiss goodbye to stamps and envelopes has saved me countless hours and reduced my financial stress significantly.
Setting up Bill Manager might take a little time upfront, but the ongoing benefits make that initial investment worthwhile. With both Quick Pay and Check Pay options, you have flexibility in how you handle different types of payments.
Have you tried Quicken for Mac Bill Pay? What’s been your experience? I’d love to hear how it’s working for other Mac users and any additional tips you might have!
Remember, staying on top of your bills isn’t just about avoiding late fees—it’s about gaining control of your financial life. And tools like Quicken Bill Manager can help make that journey a lot smoother.
The smart and simple way to pay your bills
- Receive email notification when bills arrive
- View bills to see the full details when you need them
- When you pay bills online, well automatically transfer the info to your Quicken software
Set it and forget it
- Set up repeating payments for fixed bills, such as a mortgage or for variable bills such as utilities
- Schedule payments up to one year in advance so you dont miss any payments
Quicken for Mac Tutorial: “Bill Pay” vs the Bill Module
FAQ
How do I make a payment in Quicken?
To make a payment in Quicken, select the option for making the payment manually. This is when you want to pay in cash or write a check to mail. Regardless of whether you enter the record of the payment in Quicken yourself or Quicken automatically enters it for you, you still need to send the payment.
How can I manage my bills in Quicken?
Quicken helps you manage your bills effectively. When you create a bill reminder in Quicken, you enter the details of the bill and tell Quicken when to make the next payment, the amount due, and how often to make future payments. Managing your bills using Quicken has advantages over managing them at the kitchen table.
How do I enable bank bill pay for Quicken?
Contact your financial institution to enable Bank Bill Pay for Quicken. Once you’ve confirmed that your bank has enabled Bank Bill Pay for your account, click the Check for Bill Pay button again and the indicator should change to On. You’re now set to use Bill Pay.
How can I pay bills using Quicken Bill Manager?
To pay bills using Quicken Bill Manager, first, on the Bills & Income dashboard, click the gear icon and select Copy Bill Pay payees. Next, select the bill pay payees you’d like to pay with Quicken Bill Manager. Once finished, click Copy to Check Pay. You will be prompted to initiate the verification process. Click on Select Payment Account and select an account to verify.
How do I Mark a bill as paid in Quicken?
The bill instance is marked paid without an entry in your Quicken register. You can use this option if you paid the bill by cash or you paid excess a bill previously. Mark all overdue bills as paid option from the menu to mark multiple unpaid/overdue bills as paid. Ignore: Click Ignore next to the bill.
How do I set up Direct Connect & bill pay with Quicken?
First, ensure that your financial institution supports Direct Connect and Bill Pay with Quicken. Financial institutions may support these only for certain account types. Go to the checking account from which you’d like to pay bills and click the Settings icon in the register toolbar.
What happened to Quicken Bill Pay?
You can now send electronic payments to select billers using a new, more reliable payment delivery method. Still named Quick Pay, this new way of making payments will ensure that payments arrive consistently at the biller in three business days.
Do they make Quicken for Mac?
Built by Mac users for Mac users
Get everything you need to take control of your business, rental & personal finances. Connected when you want it, separate when you need it. See all your budgets and cash flows with a dedicated business dashboard. Get a bird’s-eye view of your business for your most important items.
Can I pay my bills through Quicken?
Bill Manager lets you view and pay all of your bills in one place! Bill Manager offers two ways to easily pay your bills with Quicken: Quick Pay: Send electronic payments to billers (payees) who have online accounts accessible by Quicken. This includes over 11,000 billers.
How do I create a paycheck in Quicken for Mac?
- From the Tools menu select Manage Bills & Income Reminders.
- On the Bills and Income Reminders screen, select Add menu → Income Reminder. …
- At the bottom of the Add Reminder screen, select Paycheck Setup Wizard. …
- The Paycheck Setup wizard will appear. …
- Select Gross amount.
